Amazon AWS EC2 LAMP Quickstart Guide – 5 steps in 10 minutes

We’ve heard some people are having a few small issues with getting AWS up and running. I’ve whipped up a quick guide to get you up and running, for FREE, on AWS within a few minutes. Let’s get started.

1.) Sign Up with Amazon AWS

First you need to get signed up on Amazon in order to use their accounts. Head on over to http://aws.amazon.com/ to create an account. Creating an account is 100% free, even though they do ask for your credit card. Click on the ‘Get started for free’ button in the middle of the page. From there you’ll be taken through a quick registration.

2.) Launch Your Instance

There are are tons of different instances you can choose from.  For this tutorial we’ll just give you a simple Ubuntu 12 image.  Click https://console.aws.amazon.com/ec2/home?region=us-east-1#launchAmi=ami-3bec7952 this will take you to the launch instance screen:
choose-instance
Click on “Continue”.  On this screen for now just make sure that the Instance type (top right of screen) is “T1 Micro…”.  This is their free tier.  You get 720 hours of run time for free on it.  The other options on this screen allow you to customize the number of instances and their location, but for now just click “Continue”.
Selection_002This screen is the advanced options screen where you can select some extra options such as the kernel and monitoring for the instance.  The defaults here are fine, so just click “Continue”.
Selection_003This screen will let you configure the storage for your instance, again the defaults are fine just click “Continue”.
Selection_004This screen you can put different tags on your instance.  If you have a ton of instances it can be helpful to tag them, however as this is your first and only instance, no need to do anything other than click “Continue”.
Selection_005

This screen is important.  You are going to setup your SSH keys to access the server here.  Amazon does not launch the server with passwords, instead is uses https://wiki.archlinux.org/index.php/SSH_KeysSSH Keys.  These let you identify with the server without having to specify a password.  Read up on them, their really helpful.

You’ll want to click “Create a new Key Pair”.  Amazon does not currently let you upload your own public ssh key, you must use one stored on your account.”     Enter whatever name you want for the pair and click “Create & Download your Key Pair”.  This will download a file to your computer.

Selection_006

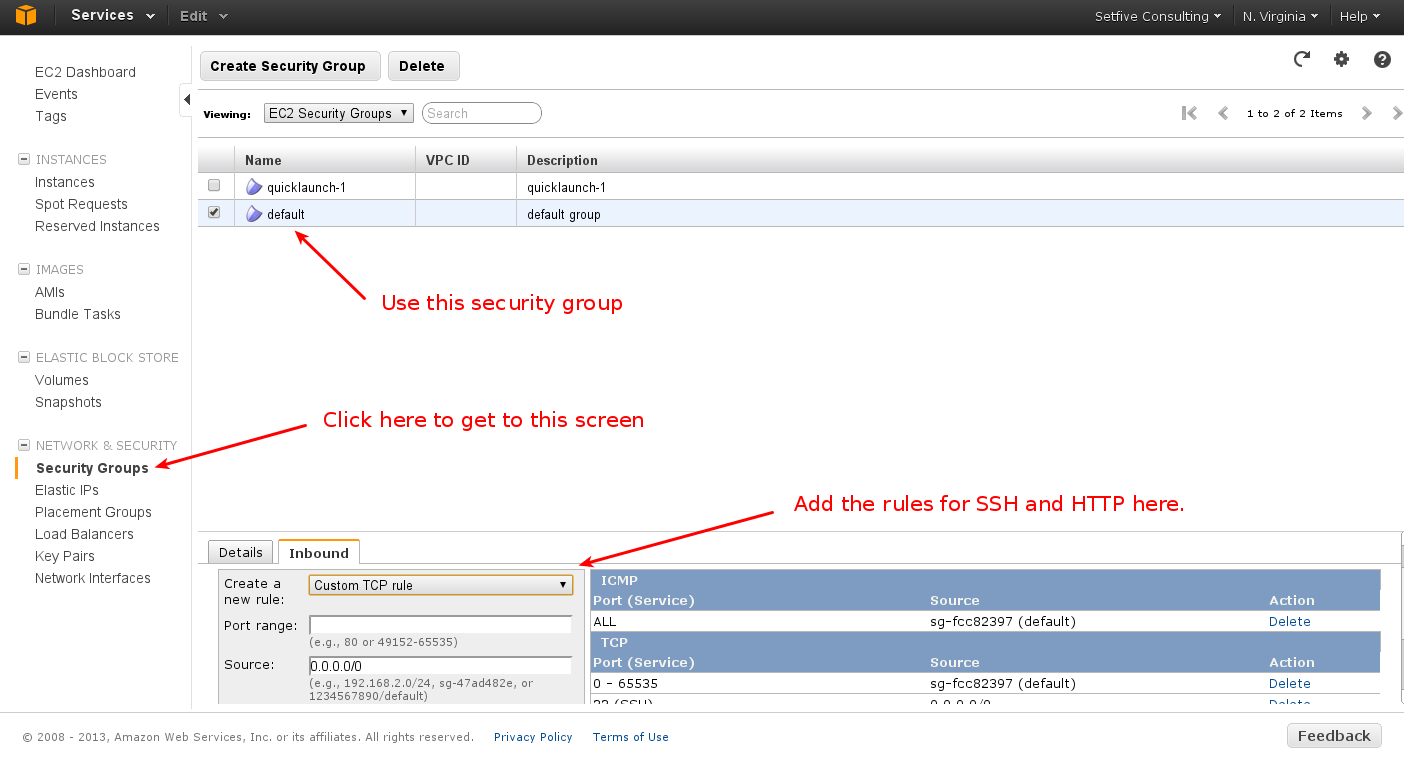
You’ll be automatically advanced to the next screen when is has downloaded.   Here you’ll configure which security group you want the server to be in.  A security group is pretty much just a set of firewall settings. Use the “default” group.  Click “Continue.”
Selection_007

It’ll allow you to review your settings and you can click “Launch”
Selection_008

3.) Connecting to your Instance

Your instance is now being launched.  You’ll see a “pending” on the screen under state until it is fully up and running.
Selection_009
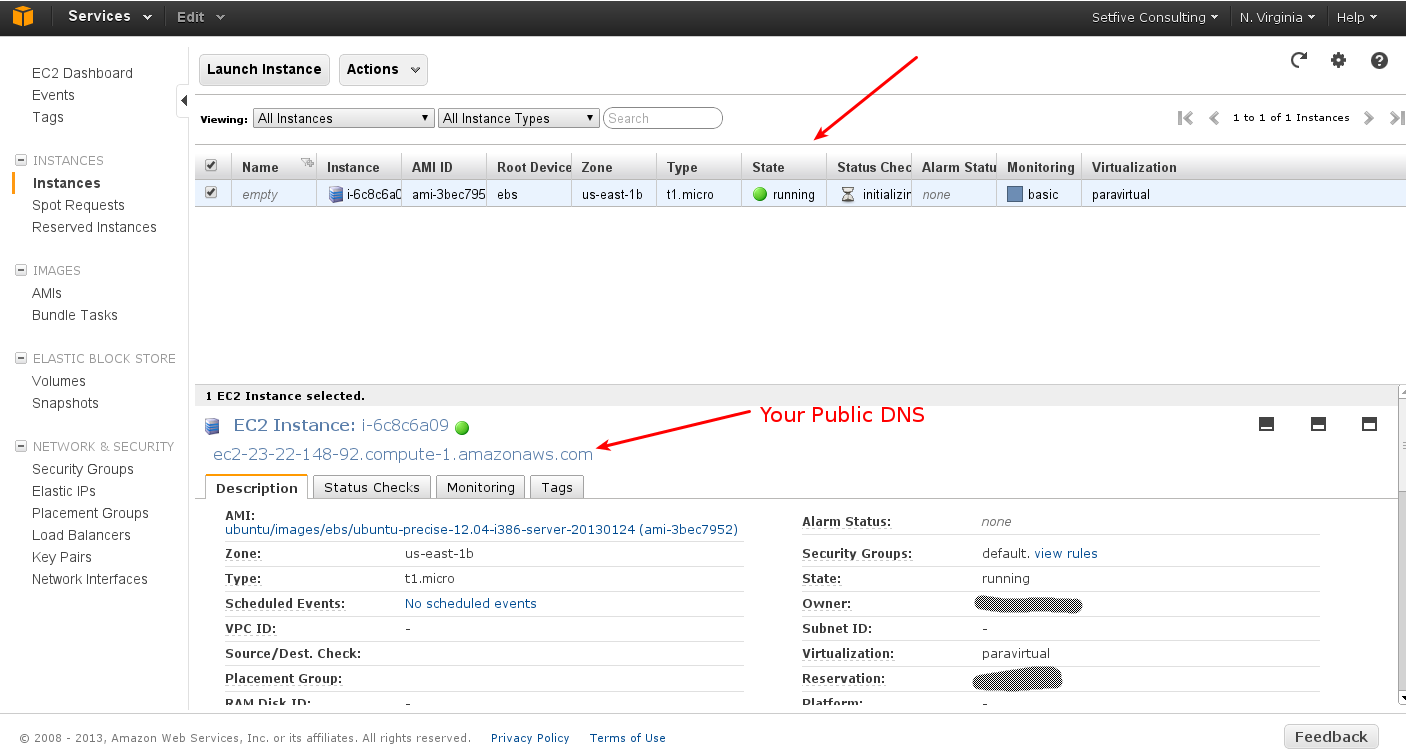
Once it is running the state will change to “running”.  Click on the server.  At the bottom of the screen you’ll see information about the server.  At the top of it under the top line “EC2 Instance ….” there is a  URL.  This is your servers public DNS record.  You’ll use this to connect.
Selection_010Before you can connect to your server you need to update your default security group to allow SSH.  On the left side of the window click on “Security Groups”.   Click default.  In the bottom pane click “Inbound”.  Select “SSH” in the dropdown for “Create a new rule:”.  Click the “Add rule” button.  Then do the same but for “HTTP”.  At this point click “Apply Rule Changes”.  If you do not do this, it will NOT save your updates.
Selection_012Now open your terminal.  Navigate to where you downloaded the file from earlier. Now it is time to SSH into your server.  You may encounter a permission error, if you do run the chmod command from the gist below.
Congratulations, you’re now on your own server!

4.) Installing the Basics

Now that you are on your server you need to install the LAMP stack.  The next steps we’ll do is have you become the super user, run apt-get and install the LAMP software.  apt-get is a package/software manager.

5.) View Your LAMP Server

You’ve now setup MySQL, Apache2, and PHP.  You can verify Apache is running by going to your public DNS in your browser.  You should see the following screen.
Selection_013

Congratulations!

You now have a fully functional LAMP web server.  To modify the files that are being served you’ll need to go to the webroot on the filesystem at “/var/www”.

Don’t forget to turn your instance off, as once your free tier runs out they will charge you.  When you turn off your instance you will not be able to recover anything on it, so make sure if you have any files you want to keep you download them first.

Congrats on launching a LAMP server on AWS.  Good luck and let us know if we can help you out on AWS or your next project!

Want to learn how to do other things on AWS?  Leave us a comment and we’ll do our best to help out!

AWS: What are the key Amazon Web Services components?

Over the last couple of years, the popularity of the “cloud computing” has grown dramatically and along with it so has the dominance of Amazon Web Services (AWS) in the market. Unfortunately, AWS doesn’t do a great job of explaining exactly what AWS is, how its pieces work together, or what typical use cases for its components may be. This post is an effort to address this by providing a whip around overview of the key AWS components and how they can be effectively used.

Great, so what is AWS? Generally speaking, Amazon Web Services is a loosely coupled collection of “cloud” infrastructure services that allows customers to “rent” computing resources. What this means is that using AWS, you as the client are able to flexibly provision various computing resources on a “pay as you go” pricing model. Expecting a huge traffic spike? AWS has you covered. Need to flexibly store between 1 GB or 100 GB of photos? AWS has you covered. Additionally, each of the components that makes up AWS is generally loosely coupled meaning that they can work independently or in concert with other AWS resources.

Since AWS components are loosely coupled, you’d be able to mix and match only what you need but here is an overview of the key services.

Route53

What is it? Route53 is a highly available, scalable, and feature rich domain name service (DNS) web service. What a DNS service does is translate a domain name like “setfive.com” into an IP address like 64.22.80.79 which allows a client’s computer to “find” the correct server for a given domain name. In addition, Route53 also has several advanced features normally only available in pricey enterprise DNS solutions. Route53 would typically replace the DNS service provided by your registrar like GoDaddy or Register.com.

Should you use it? Definitely. Allow it isn’t free, after last year’s prolonged GoDaddy outage it’s clear that DNS is a critical component and using a company that treats it as such is important.

Simple Email Service

What is it? Simple Email Service (SES) is a hosted transactional email service. It allows you to easily send highly deliverable emails using a RESTful API call or via regular SMTP without running your own email infrastructure.

Should you use it? Maybe. SES is comparable to services like SendGrid in that it offers a highly deliverable email service. Although it is missing some of the features that you’ll find on SendGrid, its pricing is attractive and the integration is straightforward. We normally use SES for application emails (think “Forgot your password”) but then use MailChimp or SendGrid for marketing blasts and that seems to work pretty well.

Identity and Access Management

What is it? Identity and access management (IAM) provides enhanced security and identity management for your AWS account. In addition, it allows you to enable “multi factor” authentication to enhance the security of your AWS account.

Should you use it? Definitely. If you have more than 1 person accessing your AWS account using IAM will allow everyone to get a separate account with fine grained permissions. Multi factor authentication is also critically important since a compromise at the infrastructure level would be catastrophic for most businesses. Read more about IAM here.

Simple Storage Service

What is it? Simple storage service (S3) is a flexible, scalable, and highly available storage web service. Think of S3 like having an infinitely large hard drive where you can store files which are then accessible via a unique URL. S3 also supports access control, expiration times, and several other useful features. Additionally, the payment model for S3 is “pay as you go” so you’ll only be billed for the amount of data you store and how much bandwidth you use to transfer it in and out.

Should you use it? Definitely. S3 is probably the most widely used AWS service because of its attractive pricing and ease of use. If you’re running a site with lots of static assets (images, CSS assets, etc.), you’ll probably get a “free” performance boost by hosting those assets on S3. Additionally, S3 is an ideal solution for incremental backups, both data and code. We use S3 extensively, usually for hosting static files, frequently backing up MySQL databases, and backing up git repositories. The new AWS S3 Console also makes administering S3 and using it non-programmatically much easier.

Elastic Compute Cloud

What is it? Elastic Compute Cloud (EC2) is the central piece of the AWS ecosystem. EC2 provides flexible, on-demand computing resources with a “pay as you go” pricing model. Concretely, what this means is that you can “rent” computing resources for as long as you need them and process any workload on the machines you’ve provisioned. Because of its flexibility, EC2 is an attractive alternative to buying traditional servers for unpredictable workloads.

Should you use it? Maybe. Whether or not to use EC2 is always a controversial discussion because the complexity it introduces doesn’t always justify its benefits. As a rule of thumb, if you have unpredictable workloads like sporadic traffic using EC2 to run your infrastructure is probably a worthwhile investment. However, if you’re confident that you can predict the resources you’ll need you might be better served by a “normal” VPS solution like Linode.

Elastic Block Store

What is it? Elastic block store (EBS) provides persist storage volumes that attach to EC2 instances to allow you to persist data past the lifespan of a single EC2. Due to the architecture of elastic compute cloud, all the storage systems on an instance are ephemeral. This means that when an instance is terminated all the data stored on that instance is lost. EBS addresses this issue by providing persistent storage that appears on instances as a regular hard drive.

Should you use it? Maybe. If you’re using EC2, you’ll have to weigh the choice between using only ephemeral instance storage or using EBS to persist data. Beyond that, EBS has well documented performance issues so you’ll have to be cognizant of that while designing your infrastructure.

CloudWatch

What is it? CloudWatch provides monitoring for AWS resources including EC2 and EBS. CloudWatch enables administrators to view and collect key metrics and also set a series of alarms to be notified in case of trouble. In addition, CloudWatch can aggregate metrics across EC2 instances which provides useful insight into how your entire stack is operating.

Should you use it? Probably. CloudWatch is significantly easier to setup and use than tools like Nagios but its also less feature rich. We’ve had some success coupling CloudWatch with PagerDuty to provide alerts in case of critical service interruptions. You’ll probably need additional monitoring on top of CloudWatch but its certainly a good baseline to start with.

Anyway, the AWS ecosystem includes several additional services but these are the ones that I felt are key to getting started on AWS. We haven’t had a chance to use it yet but Redshift looks like it’s an exciting addition which will probably make this list soon. As always, comments and feedback welcome.

Amazon Web Services: Using AWS? You Should Enable IAM

Most of our clients are using Amazon Web Services for most, if not all, of their infastructure needs. They’re doing things like using EC2 for servers, S3 for storage and backups, Route53 for DNS, and SES for sending transactional email. For the most part, everything works pretty well and the overall experience is pretty solid. One issue that does come up is that with this strong reliance on Amazon, a lot of people within an organization end up needing to login to the AWS Console. Doing things like pulling data off S3, managing EC2 instances, and creating email addresses all ultimately require logging in to Amazon. Unfortunately, as an organization grows they’ll usually end up passing around a single “master password” for their single Amazon account. Passing around a password like this poses a huge operational risk but AWS actually has built in functionality to mitigate this called Amazon IAM which helps you administer rights access on your account.

What is it?

Amazon IAM is AWS’s identty and access management solution. What it does is allows you to add additional authorized users to your Amazon account, organize them in groups, and then grant the individual groups various permissions on your account. IAM would allow you to do something like setup a group called “access backup only”, add 3 users to it, and then only allow them to download files from S3. From an operational perspective, IAM will allow every user that needs access to have their own account with its own set of permissions which can be revoked at any time.

Why you should use it

The biggest direct benefit to using IAM is that you’ll be able to give every authorized user a separate account which they can access AWS with. This means if you have to terminate an employee or stop working with an agency you won’t have to do a “fire drill” and change your AWS password or worry about which access keys they have. On top of this, since each group has limited permissions you can be confident that inexperienced users won’t accidentally do something inappropriate.

The other big benefit to implementing IAM is that you’ll be able to take advantage of multi-factor authentication. Multi-factor authentication basically means that instead of *just* needing a password to login, you’ll also need a one-time use secure token. MFA tokens can be generated in several ways, from an RSA token to a smartphone app. If you’re already using Google’s Authenticator app for your Google Account (and you should) you can just link it in with your IAM account.

Anyway, enable Amazon IAM and you’ll sleep better at night.

S3: Using Amazon S3 for large file transfers

A few days ago, a friend of mine reached out asking for a good solution for securely transferring a relatively large (~1GB) file to several of her prospective clients. Strangely, even in 2013 the options for transferring such a large file in a reliable manner is pretty limited. I looked into services like YouSendIt, WeTransfer, and SendThisFile but they all suffer from similar limitations. Most of them have a <1GB file size limit, their payment plans are monthly subscription based instead of pay as you go, and they don’t offer custom domains or access control. Apart from these services, there is also the trusty old school option of using an FTP server but that raises the issue of having to maintain your own FTP server, using a non-intuitive FTP client, and still being locked into paying a monthly fee instead of “pay as you go". Stepping back and looking at the issue from a different angle, it then became clear that the S3 component of Amazon’s Web Service offering is actually an ideal solution for this problem. The S3 piece of AWS is basically a flexible “cloud based” storage solution that lets you programmatically upload files, store them indefinitely, and then serve them as you please. Looking at the issues we’re trying to overcome, S3 satisfies all of them out of the box. S3 has a single file size limit of 5 Terabytes, files can be served off a custom domain like archives.setfive.com, billing is pay as you go depending on the resources you use, and S3 supports access control so you have fine grained access over who can download files and for how long. So how do you actually use S3?

Setting up and using S3

  • The first thing you’ll need is an Amazon account that has S3 enabled. If you already have an Amazon account, just head over to http://aws.amazon.com/s3/ to activate S3 for your account.
  • Next, there are several ways to actually use S3 but the easy way is probably using Amazon’s own Web Console. Just head over to https://console.aws.amazon.com/s3/home?region=us-east-1 to load the console.
  • In AWS parlance, you’ll need to create a “bucket” which is the root organizational structure on S3. You can map a “bucket” to a custom domain name so think of it like the “drive” that you’re upload files to. Go ahead and create a bucket!
  • Next, click the name of your bucket and you’ll get “into” the bucket where you should see a notice telling you the bucket is empty. This is where you can upload and delete files or create additional organizational folders. To upload a file, click the “Actions” menu in the header and select “Upload”. Click upload, and then in the popup select “Add Files” to add some files and “Stat Upload” to kick off the upload.
  • When the upload finishes, in the left panel you’ll see the file you just upload. Congratulations you’re using the cloud! If you want to make the file PUBLIC, just right click on it and click “Make Public”, this will let you access the file without any special URL arguments like https://s3.amazonaws.com/big-bertha/logo_horizontal.png
  • To get the link for your file, click it to see the properties and then on the right panel you’ll see the link.
  • To delete a file, just right click on it and select “Delete”

Anyway, thats a quick rundown of how to use Amazon’s S3 service for file transfers. The pricing is also *very* cheap compared to traditional “large file transfer” services.

Check out some other useful links about S3:

SwiftMailer: Expected response code 250 but got code 421

Last week we deployed a background script for a client which was used intermitently to batch send a couple of hundred emails. We were using SwiftMailer but weren’t able to use the “Spool” strategy to send because the messages contained Unicode characters which was breaking the serialization. Anyway, we ended up with code that looked something like the following:

Nothing to crazy going on. We were also sending the emails through Amazon SES which is why we introduced the sleep(..) to keep ourselves below the sending limits.

Things seemed like they were fine but then we’d seemingly randomly get the following exception:

PHP Fatal error:  Uncaught exception 'Swift_TransportException' with message 'Expected response code 250 but got code "421", with message "421 Timeout waiting for data from client.
"' in /usr/share/php/symfony/vendor/swiftmailer/classes/Swift/Transport/AbstractSmtpTransport.php:406
Stack trace:
#0 /usr/share/php/symfony/vendor/swiftmailer/classes/Swift/Transport/AbstractSmtpTransport.php(290): Swift_Transport_AbstractSmtpTransport->_assertResponseCode('421 Timeout wai...',$
#1 /usr/share/php/symfony/vendor/swiftmailer/classes/Swift/Transport/EsmtpTransport.php(197): Swift_Transport_AbstractSmtpTransport->executeCommand('MAIL FROM: <adm...', Array, Arra$
#2 /usr/share/php/symfony/vendor/swiftmailer/classes/Swift/Transport/EsmtpTransport.php(267): Swift_Transport_EsmtpTransport->executeCommand('MAIL FROM: <adm...', Array)
#3 /usr/share/php/symfony/vendor/swiftmailer/classes/Swift/Transport/AbstractSmtpTransport.php(441): Swift_Transport_EsmtpTransport->_doMailFromCommand('admin@chatthrea...')
#4 /usr/share/php/symfony/ve in /usr/share/php/symfony/vendor/swiftmailer/classes/Swift/Transport/AbstractSmtpTransport.php on line 406

After doing some digging around, it turns out Amazon’s SES service has a connection timeout which SwiftMailer was tripping up on. I couldn’t actually find an official published timeout limit but looking at the SwiftMailer code it seemed like it was possible to set a timeout inside Swift. We added a “timeout: 5” setting to our Symfony factories.yml file inside the SwiftMailer settings and it seemed to fix our issues.