vue.js: Using vue with a Symfony Form

One of our new projects here at Setfive is a service that will allow people to create a subscription that will condense AWS product updates into a single email notification with the user’s chosen frequency. An important aspect to a product like this is a captivating sign up — we wanted to include a clean and dynamic sign up section on the website that would help to entice people to sign up and use the product.

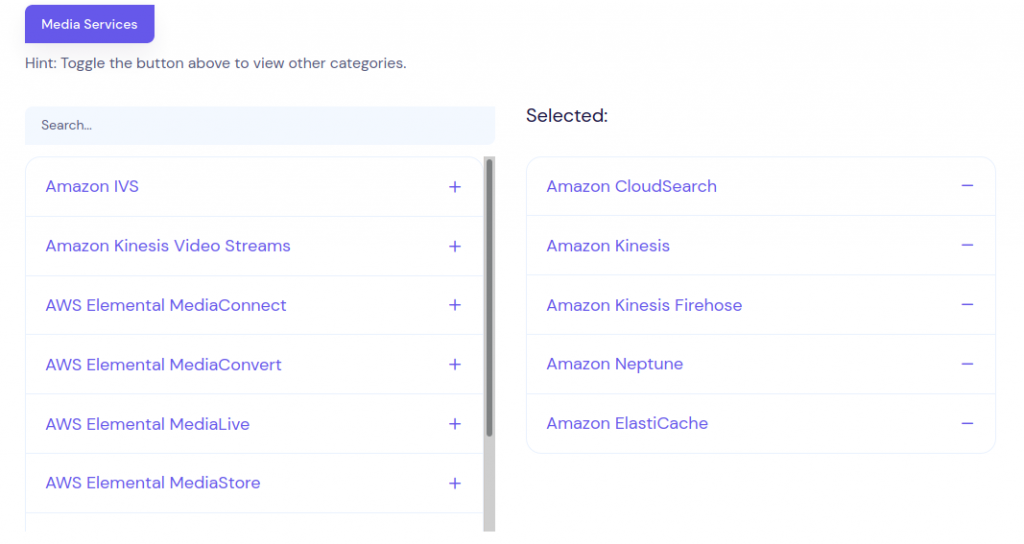
This sign up form involves two side by side lists of ‘sources’ you would like updates about (i.e. Amazon EC2, Amazon Lambda, Amazon SNS), a textbox for your email, and a button to submit. The left side Sources are your options, which you can be adjusted via search or selecting different categories. The right side shows your selected sources — clicking a source will select it and move it to the right side, and vice versa to deselect one of your choices:

The majority of the project is handled by Symfony — Symfony is perfect for creating rather generic data entry forms made up of different input types such as textboxes, radio buttons, and select boxes. However, we wanted our sign up section to be far more dynamic than what would be easily built through Symfony’s FormBuilder.

Enter Vue.js: a JavaScript framework that can be easily integrated within a traditional web app. If you keep up to date with our Setfive blog posts, you may have seen my last blog about getting started with Vue.js. One of the key benefits of Vue.js is the ability to reuse/combine Vue components with each other and with Symfony’s forms — this allows us to reap the benefits of a dynamic/reactive Vue component as well as the automatic data validation and creation of Symfony.

The Goal:

We at Setfive love Symfony and to stay consistent, we try to use Symfony wherever possible. We wanted to reuse the ‘source select’ portion of the sign up section to allow existing users to edit their subscriptions and create new ones. However, for a registered user the create and edit subscription forms don’t require an email field and we’d instead want to immediately present ‘name’ and ‘frequency’ fields. his being the case, we knew combining our ‘source select’ Vue component with a Symfony form would be our best option — Symfony forms allow for much simpler data validation and can be displayed simply using Twig helpers.

With a combination of Symfony and Vue, we were able to build a dynamic source selecting component with Vue and allow Symfony to validate the selected sources, the name, and the frequency automatically without any extra work.

The Solution:

The first thing we needed to do was split our existing ‘source select’ component up so that the double list selector is independent from the other fields on the sign up form. Fortunately, it is simple to create parent and child Vue components and pass data from child to parent. This is done through Event Emitting: when a source is selected in the child component (source select), that ‘event’ and its data is emitted to the parent component (form composed of source select + email field and submit button).

It is a bit more complicated to synchronize this data with a Symfony form. To solve this problem, a few steps were needed.

First, we had to see what a form would look like if we did this without Vue — in other words, if we created a form and allowed you to use checkboxes to select your sources, what would the HTML elements of the individual sources look like when selected/not selected?

<input type="checkbox" id="subscription_edit_sources_5" name="subscription_edit[sources][]" class="form-check-input" value="5" checked="checked">

Our Symfony Form type ended up looking like:

Next, our Subscription form needs to include that form element (sources), but not actually render it on screen. Via Twig:

{% do form.sources.setRendered %}

This way, ‘sources’ is a form element whose data will be submitted, but not displayed via Twig.

Finally, we need to handle the logic of sources being selected and deselected. By tracking the ID of each source, we can create hidden HTML elements containing the exact same data that would be present if we were rendering the form entirely with Symfony and Twig.

When a source is selected, our parent component receives that data and we create the corresponding element, without displaying it (class=”d-none”):

$("#subscription-form")
.append($('<input id="source_'+source.id+'" type=text class="d-none"/>')
.attr('name', 'subscription_edit[sources][]')
.val(source.id)
.prop('checked', true));

When a source is deselected, we simply delete that element:

$("#source_"+source.id).remove();

Once a user hits submit, the form data containing those hidden input elements is compiled and the ‘sources’ form element mentioned above will now contain a list of the source IDs. Behind the scenes, Symfony converts those IDs to their corresponding Source object and Voila! Your subscription now contains the sources you chose!

Have any questions or feedback? Let me know in the comments!

How I stopped worrying and learned to love Vue.js

Through the beginning of my career in software engineering, I’ve found it challenging yet helpful to be exposed to multiple different languages and practices. This quickly teaches what languages, frameworks, and solutions can be used for the different problems that arise on a day-to-day basis. However, most of my professional experience lies with backend development in PHP as well as some recent front end development using jQuery and a bit of Angular. With a combination of PHP, Symfony, and jQuery, I’ve been fortunate to build features that I hope both end users and admins alike will appreciate. Many of these features however, are mostly based on relatively simple forms — the user enters their data using textboxes, dropdowns, radio buttons, etc. and the backend does all of the complicated work.

With one of our new projects here at Setfive, we wanted a rich and reactive user interface for the sign-up portion, while Symfony would handle the rest. We could have just used Angular for the whole thing and come up with something similar, but using Angular would mean we’d need the entire page in Angular — we didn’t want to lose our Symfony functionality for one component of the page. Using only jQuery was another option, but jQuery can quickly get complicated, hard to read, and unmaintable.  Like with many of the problems we encounter here at Setfive, a little bit of research led to a viable solution.

Introducing: Vue.js — a JavaScript framework that allows you to build rich JS components similar in design to Angular but without using the framework for the entire page. That last aspect was especially appealing to us. With Vue.js, you can build a single component with whatever functionality you need, and drop it into the HTML at basically any spot in your project and the component can work independently of everything else on that page. Thus this component appears on the page alongside anything else we have on there from our Symfony/Twig side.

Similar to Angular, Vue.js allows you to use asynchronous functions to quickly send info back and forth via GET and POST requests and notably change the information on the page almost instantly. For our project we would be able to do exactly what we wanted to do: create a sign-up section that would allow you to quickly select different sources from different categories, easily view what you can select/have selected, enter your email, and submit — all in an interactive and easy to use display. The idea was perfect, but the setup not so much.

I imagine that in a scenario where you are creating a project using mostly JavaScript and HTML/CSS, adding a basic Vue component to the project would be pretty easy as the documentation for Vue is solid. However, the process of adding a component to a Symfony project is a bit different, specifically because using Webpack Encore with Symfony is understandably not something that the Vue.js documentation covers. A quick search on the internet found me the perfect guide for integrating Vue.js into a Symfony project. Combining this guide with the actual Vue and Symfony documentation, I was able to get the crucial ‘Hello world’ to display on the page and we were ready to get going.

Similar to the Twig templates we normally use in our Symfony projects, Vue provides a few crucial features that allowed the bulk of this component to work as designed:

  • ‘For loops’ allowed us to display a drop down menu of categories, and a reactive list of sources based on which category was chosen.
  • ‘If statements’ allowed us to display errors and a confirmation message upon submitting
  • With on-click functions, we were able to instantly move sources back and forth between the list of ones they select and ones not yet selected. 
  • The input models allowed us to easily associate string variables with the different textbox inputs, allowing us to add a ‘search’ feature. 

 As someone who is not an expert in JavaScript, figuring all of this out took a lot of debugging. Luckily, the guide mentioned before had a lot of what I needed in it as well as StackOverflow and random other guides and sites found throughout my search. With the instant reactivity of Vue.js, debugging was made easy and I was able to roll through my development without having to spend much if any time waiting for data to load/finish. The main pieces that caused trouble involved making sure items displayed correctly based on what was already selected. That sort of validation of the display had to all be done manually in JavaScript. The validation of submitted data and the usage of that data can be done easily via Symfony, allowing us to use Vue solely to make a reactive and easy to use user interface that we hope will entice people to sign up for this product. 

One of the biggest pros of software development in my eyes is the satisfaction of designing and successfully building something new. Creating something, big or small, in an unfamiliar language/framework heightens that satisfaction even more. A lot of times though, the road to the end product in a new language/framework is filled with tons of frustration and confusion (especially for a relatively new developer). However, building this component using Vue was easier than expected once past my struggles with the initial set up. Thanks to the documentation from Vue and Symfony, StackOverflow, as well as the guide here by Krasimir Hristozov, I was able to create something that works well in a totally new framework without all of the trouble that can normally come with that process. Vue.js is described on their website as a blazing fast, “adoptable ecosystem” that can be used quickly by anyone who knows HTML, CSS, and JavaScript and I can attest to that. For anyone who needs a relatively small reactive component in their project, where you know jQuery will get unnecessarily complicated, Vue.js is the way to go.

nginx: Using auth_request to secure vhosts

One of our clients recently had a unique use case. They had a Wiki site where they wanted to restrict viewing of posts to only their app’s authorized users. Picture something like a SaaS app where the Wiki site had proprietary content that our client only wanted paying users to access.

The two obvious options to implement this would be:

  • Create a Wiki user for each authorized user – this has the downside that we’d need to maintain two accounts, figure out how to keep users logged into both, and deal with synchronizing account data.
  • Modify the Wiki’s application code to authorize the users in some fashion – this is problematic because it would make upgrading the Wiki software difficult.

Turns out there’s a third option which is much smoother! Nginx has a directive called auth_request which allows nginx to authorize access to a resource based on a 2nd HTTP request.

The way it works is:

  • Your SaaS app is setup at platform.setfive.com where users are authenticated by a Symfony application.
  • You configure your Symfony application to send a cookie back with a wildcard domain of “.setfive.com”
  • Your wiki is running at wiki.setfive.com and configured to authorize requests to platform.setfive.com/is-authenticated
  • Now, when users request wiki.setfive.com their browser will send your Symfony authentication cookie, nginx will make a request to platform.setfive.com/is-authenticated, and if they’re authenticated they’ll be granted access to your wiki.

The nginx config for this is pretty straightforward as well. One thing to note is this module is not standard so on Ubuntu you do need to install the nginx-extras package to enable it.

Design: How to Make a Vintage Website

Remember what websites looked like before they became so interactive and graphic savvy? The World Wide Web- in the early 2000s- was not aesthetically pleasing. So, we decided to recreate it. Out with the new, in with the old.

Below, we have provided an example of a modern-looking website. Specifically, we used a Bootstrap template. Then, we have listed the changes we made to the current website code. We discovered that the key to making an old-looking website is not using specific technologies, but using the styles and the aesthetics that your site embraces. Let’s take a Bootstrap template, Clean Blog – Bootstrap Blog Theme, and how we retrofitted it!

The current, modern version looks like:

To make it “look old” I made the following changes:

  • Removed all of the JavaScript
  • Dropped the custom fonts, went back to a fixed width Sans-Serif font (Courier New) and dropped the line-height
  • Switched the background image to something low quality and repeating
  • Filled all the whitespace by setting the content to 100% width
  • Add some obnoxious color – see links and menu items. 
  • Toss in a gradient for good measure

The final Product:

Some other options for replicating an early 21st century website include: the venerable marquee HTML tag, animated GIFs, and of course, anything neon.

Of course there is always the all time GOAT retro website, the original 1996 Space Jam website, which is still up!

Have additional suggestions for how to make an old-looking website, or any formatting requests you’d like to see? Let us know in the comments below!

Big trouble with Big O

The main reason I decided to get into computer science was because my father used to be a programmer. Now, he has moved into the project management field, but still oversees different types of large scale computer science projects. He works from home a lot and has never seemed like he was very busy or overly stressed about work, so my hope is that getting into the computer science field will lead me down a similar path. Whenever I would complain about school programming projects, he would always tell me how much larger and more complex it gets in real world programming projects but I never really thought much of it.

After working on software for some time, I can now understand what he was talking about — my programming went from projects made up of a couple classes consisting of three or four functions, to a project made up of 50+ classes with I don’t even know how many functions as well as entities, endpoints, html files, css files, and a database with multiple related tables. To say it was a large increase in complexity would be a huge understatement. One thing I learned very quickly is that when you are working with large amounts of data, efficient programming is incredibly important and can be the difference between a webpage taking 10 seconds to load and the page loading almost instantly.

One of the most important aspects of efficient programming is the concept of Big O notation — a way to classify the speed at which your program will run and the memory it will take up. The smaller the Big O, the better. For example, if you have a loop running over a string of length n, your Big O notation will be order n, or O(n) in Big O notation — the loop needs to iterate n times to complete. However, if you can do whatever you need to do without a loop, you can save a lot of memory and time. This would not really matter in a loop of length 20, something you may see in a college project. However, if you are running a loop over an array of length 10,000, you will see a serious increase in the time it takes for your loop to complete as computers do not give instantaneous responses! The idea is to avoid the use of loops if you ever can, though this is not always possible.

A more common problem arises when using nested loops. If you want to count the letters in an array of strings, you need one loop to run over the array of strings, and another loop within that one to run over the string you are currently on. In other words, your loop needs to run n*m times — n strings with m letters in each string. For simplification, this is known as order n*n, or order n^2. Nested loops should be avoided if ever possible, as again the difference between a loop running 1000 times and 1000*1000 times is quite literally exponential. The more nested loops you add, the longer a program will take to run in a field where the difference between a 2 second load time and a 4 second load time is huge. With the example above of counting the number of letters in an array of strings, this can be done with a nested for loop:

However, with a little creativity, you can avoid using nested loops much of the time. For example, instead of pushing all the elements into an array, you can increase your charCounter2 variable by the length of each string as you add them:

This will eliminate the nested for loop, and greatly reduce your runtime in cases of large arrays. Each .length call runs at order n, thus giving you an order of n + n + n + n, simplified to be just order n. The nested for loop would run at order n^2 — if n = 1000 elements, the runtime difference would be 4000 vs 1,000,000. As n gets larger and larger, this difference becomes increases more and more while the load time of your webpage would reduce considerably.

Recently, I ran into a substantial Big O problem in my code. When trying to count the occurences of each word in an array of paragraphs, I had a loop within a loop within a loop to give the correct output. This seemed totally fine when testing with 4 or 5 small paragraphs and I was just happy to get it working. The first loop iterated over the array of paragraphs (denoted as Review[]), and the next iterated over each of those paragraphs (review.body). The third loop iterated over my variable storing the current word counts to see if that word previously occurred — if not then it was added, and if it was then that word’s count incremented by 1.

However, when I used it with the actual arrays of thousands of longer paragraphs, it took 10-15 seconds complete which was way too long. With some help from colleagues, I discovered associative arrays. In a normal array, you would have to loop through each element in the array to see if the element you are checking exists in that array. If it does not, then you must iterate over every element in the array to check. With associative arrays on the other hand, checking to see if an element is within the associative array is much simpler. When you add an element, a hash string is generated based on that element. Therefore, when you check to see if an element is in an associative array, your computer computes the same exact hash and knows exactly where to look to see if that hash already exists. Thus eliminating an entire for loop brought my function down from order n^3, to order n^2 and reduced the load time by 8-12 seconds. If n=1000, the amount of iterations would drop from 1,000,000,000 to 1,000,000!

The word cloud generator now only takes a few seconds to create beautiful word clouds as opposed to 10-15 seconds:

When it comes to web development, load time is very important. Many times if I try to click on something on my phone and it takes more than a couple seconds to load, I just immediately exit out due to impatience. When you create a website, you do not want users exiting out because your site takes a few seconds to load even with a solid internet connection. It is important to start practicing efficient programming early even when working with small amounts of data.

This will help you avoid situations similar to mine, where you have to figure out how to write efficient programs with data sets of thousands of elements and will save you from a few infinite loops that immediately crash your computer! Efficient programming is a major key throughout all of computer science, but is especially important when it comes to a user interface and a user’s experience!