Tips for setting up a TypeScript nodejs project

Note: This post originally appeared at Codeburst

At Setfive Consulting we’ve become big fans of using TypeScript on the frontend and have recently begun adopting it for backend nodejs projects as well. We’ve picked up a couple of tips while setting up these projects that we’re excited to share here!

Directory structure

For most nodejs projects any directory layout will work and what you pick will be a matter of personal preference. TypeScript is similar but in order to get the TypeScript compiler to generate JavaScript code into a “dist/” you’ll need to write your code inside a separate directory like “src/” within your project. So you’ll want a layout like the following:

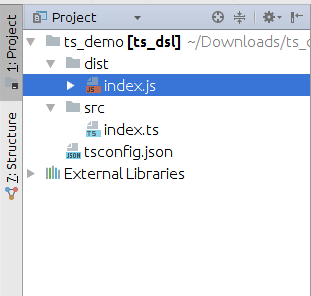
And the compiler will produce JavaScript code in “dist/” from your TypeScript sources in “src/”.

Setup tsconfig.json

As you can see above you’ll want a tsconfig.json file to configure the behavior of the TypeScript compiler. tsconfig.json is a special JSON configuration file that automatically sets various flags for you when you run “tsc” with it present. You can see an exhaustive list of the available options at here. We’ve been using the following as a solid starting point:

From a build perspective this will configure a couple of things for you:

  • sourceMaps are enabled so you’ll be able to use node’s DevTools integration to view TypeScript sources alongside your JavaScript
  • The compiler will output into a “dist/” folder
  • And it’ll compile all of your source files under the “src/” directory

ts-node and nodemon

One of the stumbling blocks to using TypeScript with nodejs is the required compilation step. At face value, it seems like the required workflow would be to edit a TypeScript file, run the compiler, and then run the generated JavaScript on node. Thankfully, ts-node and nodemon make that a reality you wont have to suffer.

ts-node is basically a wrapper around your nodejs installation that will allow you to run TypeScript files directly, without invoking the compiler. Their Readme highlights how it works:

TypeScript Node works by registering the TypeScript compiler for the .ts, .tsx and – when allowJs is enabled – .js extensions. When node.js has a file extension registered (the require.extensions object), it will use the extension internally with module resolution. By default, when an extension is unknown to node.js, it will fallback to handling the file as .js (JavaScript).

So with ts-node you’ll be able to run something like “ts-node src/index.ts” to run your code.

nodemon is the second piece of the puzzle. It’s a node utility that will monitor your source files for changes and automatically restart a node process for your. Perfect for building express or any server apps! We’ve been using the following nodemon.json config file:

And then you’ll be able to just invoke “nodemon” from the root of your project.

Remember “@types/” packages

Since you’re writing nodejs code chances are you’re going to want to leverage JavaScript libraries. TypeScript can interoperate with JavaScript but in order for the compiler to compile without errors you’ll need to provide “.d.ts” typings for the libraries you’re using. For example, trying to compile the following:

import * as _ from "lodash";
console.log(_.range(0, 10).join(","));

Will result in a TypeScript error:

src/index.ts(1,20): error TS7016: Could not find a declaration file for module ‘lodash’. ‘/home/ashish/Downloads/node_modules/lodash/lodash.js’ implicitly has an ‘any’ type.
Try `npm install @types/lodash` if it exists or add a new declaration (.d.ts) file containing `declare module ‘lodash’;`

Even though the output JavaScript file was successfully generated.

The “.d.ts” files are type definitions for a JavaScript library describing the types used, function signatures, and any other type information the compiler might need.

Several popular JavaScript libraries, like moment, have begun shipping the typings files within their main project but many others, like lodash, haven’t. In order to get libraries that don’t have the “.d.ts” files within their main project to work you’ll have to install their respective “@types/” packages. The “@types/” namespace is maintained by DefinitelyTyped but the definitions themselves have been written by contributors. Installing “@types/” packages is easy:

npm install — save @types/lodash

And now the compiler will run without any errors.

Off to the races!

At this point you should have a solid foundation for a TypeScript powered nodejs project. You’ll be able to take advantage of TypeScript’s powerful type system, nodejs’ enormous library ecosystem, and enjoy a easy to use “save and reload” workflow. And as always, I’d love any feedback or other tips!

Thinking about adopting TypeScript at your organization? We’d love to chat.

3 awesome features of the TypeScript type system

(Note: This originally appeared on Codeburst)

As of 2017 TypeScript has emerged as one of the most popular languages which can be “compiled down” to JavaScript for both browser and nodejs development. Compared to alternatives like Facebook’s Flow or CoffeeScript one of TypeScript’s most unique features is its expressive type system. Although TypeScript’s type system is technically dynamic, if you fully embrace it you’ll be able to leverage several features of the TypeScript compiler.

So what are a couple of these features? We’ll be looking at code from Setfive’s CloudWatch Autowatch an AWS cloud monitoring tool written in TypeScript. Since TypeScript is evolving so quickly it’s worth noting that these examples were run on version 2.4.2. Anyway, enough talk lets code!

Non-nullable types

If you have any experience with Java you’ve probably encountered the dreaded NullPointerException when you tried to deference a variable holding a “null” value. It’s certainly a pain and has been derided as a “billion dollar mistake” by its creator. To tackle NullPointerException bugs TypeScript 2.0 introduced the concept of non-nullable types. It’s “opt-in” via the “strictNullChecks” compiler flag which you can set your tsconfig.json

Consider this simple sample:

By default, the TypeScript compiler will compile that code since “null” is assignable to string[] but you’ll get an error about half the time you run it. Now, if we set “strictNullChecks: true” and run the compiler we’ll get an error:

partyguests.ts(5,9): error TS2322: Type ‘null’ is not assignable to type ‘string[]’.

Since the compiler can infer that at least one code path in the function produces a null which is now incompatible with an array. An example of this in the Autowatch code are the checks to ensure that PutMetricAlarmInput instances aren’t created with null dimensions. At line 462 for example.

Exhaustive type matching

Most programming languages with a Hindley–Milner type system have some functionality to perform a “pattern match” over a type. In practice, that allows a developer to make decisions about what to do with a set of objects based on the concrete type vs. their abstract signatures. For example, in Scala:

At face value it appears as if you can replicate this ES2015 JavaScript with something like:

That misses an important piece from the Scala example, the compiler guarantees an exhaustive match. If you added a new subclass of “Notification” like BulkSMS the Scala compiler would error because showNotification is missing that case. The JavaScript example wouldn’t be able to provide this and you’d end up getting a runtime error.

However, with TypeScript’s “never” type it’s possible to have the compiler guarantee an exhaustive match for us. We could do something like the following:

The important part is the call to “assertNever” which the compiler will error on if it detects is a reachable code path. We can confirm this if we add “BulkMessage” to the “MyNotification” type but not the if:

If you run the TypeScript compiler against that you’ll get an error highlighting that your if isn’t exhaustive since it’s hitting the “never”:

match2.ts(19,24): error TS2345: Argument of type ‘BulkMessage’ is not assignable to parameter of type ‘never’.

It’s certainly not as elegant as the Scala example but it does the job. You can see a real example in Autowatch starting at line 168 where we used it to guarantee exhaustive matching on the available AWS services.

Read-only class properties

Marking a class property “readonly” signals to the compiler that code shouldn’t be able to modify the value after initialization. Although “readonly” may sound similar to marking a property as “private” it actually enhances the type system in important ways. First, “readonly” properties make it possible to more faithfully represent immutable data. For example, a HTTP Request has a “url” which will never change after the request has started. And by marking properties as “readonly” as opposed to private you’re still able to return literal objects with matching properties.

Let’s look at an example:

If you run that through the TypeScript compiler you’ll get an error advising that the property is readonly:

readonly.ts(6,5): error TS2540: Cannot assign to ‘url’ because it is a constant or a read-only property.

Now, if you try and mark the url property as private and create a literal HttpRequest you’ll notice you’ll get an error:

But if you switch it back to “readonly” it’ll work as expected.

You can see real world usage of this in Autowatch, where we marked properties in our Config class as readonly since they should never change once the object has been constructed.

That’s a wrap

Well that’s three pretty cool features of the TypeScript type system that should help you be more productive and write better code. If you found these interesting, there’s several other interesting type related features that landed in 2.3+ versions of TypeScript that are worth checking out.

MySQL: Composite indexes in 5 minutes

Despite how important they are, MySQL indexes are a bit of a dark art. Sure everyone knows indexes are important but details on how they’re implemented and when they’ll be used are hard to come by. Beyond regular indexes, MySQL’s composite indexes are especially opaque in regards to how and when they’ll be used. As the name suggests composite indexes are an index constructed across two columns versus a regular index on a single column. So when might a composite index come in handy? Let’s take a look!

We’ll look at a table “client_order” that captures some fictional orders from our fictional clients:

And we’ll fill it up with 5 million fictional orders with dates spanning the last 10 years. You can grab the data from https://setfive-misc.s3.amazonaws.com/client_order.sql.gz if you want to follow along locally.

To get started, let’s figure out the total amount spent for a couple of clients:
https://gist.github.com/adatta02/f675b2c7b0659ab960d791b44ee02861

~1.5 seconds to calculate the sums and according to the EXPLAIN MySQL had to use a temporary table and a filesort. Will an index help here? Lets add one and find out.

~0.2 seconds and looking at the EXPLAIN we’ve cut down the number of rows MySQL has to look at to 424, much better. OK great, but now what if we’re only interested in looking at data from Christmas Eve in 2016?

(Note: Details on why we’re querying with full timestamps below)

As you can see, MySQL is still using the client_id index but we’re left still scanning 281,308 rows even though only 335 are actually relevant to us. So how do we fix this? Enter, the composite index! Let’s add one on (client_id, created_at) and see if it helps our query:

It helps but we’re clearly still looking a lot more rows than we need. So what gives? It turns out the order of the composite index is actually critically important since that dictates how MySQL assembles the b-tree for the index. Let’s flip the order of our index and try again:


And there you go! MySQL only has to look at 1360 rows as expected.

So what’s up with having to query with the full timestamps vs. just using DATE(created_at)? It turns out MySQL can’t use datetime indexes when you apply functions to the column you’re querying on. And beyond that, even certain ranges cause MySQL to not select indexes that would work fine:

Which then leads to the unintuitive conclusion that if you actually needed to implement any sort of aggregation by day you’d be better off adding a “date” column calculated from the “created_at” and indexing on that:

Anyway, as always comments and feedback welcome!

Electron: Beating anti-scraping software with Electron

I was recently out with a friend of mine who mentioned that he was having a tough time scraping some data off a website. After a few drinks we arrived at a barter, if I could scrape the data he’d buy me some single malt scotch which seemed like a great deal for me. I assumed I’d make a couple of HTTP requests, parse some HTML, grab the data and dump it into a CSV. In the worst case I imagined having to write some custom code to login to a web app and maybe sticky some cookies. And then I got started.

As it turned out this site was running one of the most sophisticated anti-scraping/anti-robot packages I’ve ever encountered. In a regular browser session everything looked normal but after a half dozen or so programmatic HTTP requests I started running into their anti-robot software. After poking around a bit it, the blocks they were deploying were a mix of:

  • Whitelisted User Agents – Following a few requests from PHP cURL the site started blocking requests from my IP that didn’t include a “regular” user agent.
  • Requiring cookies and Javascript – I thought this was actually really clever. After a couple of requests the site started quietly loading an intermediate page that required your browser to run Javascript to set a cookie and then complete a POST request to a URL that included a nonce in order to view a page. To a regular user, this was fairly transparent since it happened so quickly but it obviously trips up a client HTTP client.
  • Soft IP rate limits – After a couple of dozen requests from my IP I started receiving “Solve this captcha” pages in order to view the target content.

Taken all together, it’s a pretty sophisticated setup for what’s effectively a niche social networking site. With the “requires Javascript” requirement I decided to explore using Electron for this project. And turns out, it’s a perfect fit. For a quick primer, Electron is an open source project from GitHub that enables developers to build cross platform desktop applications by merging nodejs and Chrome. Developers end up writing Javascript that can leverage the nodejs ecosystem while also using Chrome’s browser internals to render windows and widgets. Electron helps in this use case because it provides a full Chrome browser that’s scriptable and has access to node’s system level modules. For completeness, you could implement all of this in a Chrome extension but in my experience extensions have more complicated non-privileged to privileged communication and lack access to node so you can’t just fire off a “fs.writeFileSync” to persist your results.

With a full browser environment, we now need to tackle the IP restrictions that cause captchas to appear. At face value, like most people, I assumed solving captchas with OCR magic would be easier than getting new IPs after a couple of requests but it turns out that’s not true. There weren’t any usable “captcha solvers” on npm so I decided to pursue the IP angle. The idea would be to grab a new IP address after a few requests to avoid having to solve a captcha which would require human intervention. Following some research, I found out that it’s possible to use Tor as a SOCKS proxy from a third party application. So concretely, we can launch a Tor circuit and then push our Electron HTTP requests through Tor to get a different IP address that your normal Internet connection.

Ok, enough talk, show me some code!

I setup a test “target page” at http://code.setfive.com/scraper_demo/ which randomly shows “content you want” and a “please solve this captcha”. The github repository at https://github.com/adatta02/electron-scraper-skeleton has all the goodies, a runnable Electron application. The money file is injected.js which looks like:

To run that locally, you’ll need to do the usual “npm install” and then also run a Tor instance if you want to get a new IP address on every request. The way it’s implemented, it’ll detect the “content you want” and also alert you when there’s a captcha by playing a “ding!” sound. To launch, first start Tor and let it connect. Then you should be able to run:

Once it loads, you’ll see the test page in what looks like a Chrome window with a devtools instance. As it refreshes, you’ll notice that the IP address is displays for you keeps updating. One “gotcha” is that by default Tor will only get a new IP address each time it opens a conduit, so you’ll notice that I run “killall” after each request which closes the Tor conduit and forces it to reopen.

And that’s about it. Using Tor with the skeleton you should be able to build a scraper that presents a new IP frequently, scrapes data, and conveniently notifies you if human input is required.

As always questions and comments are welcomed!

Nodejs: Using Electron with Gearman for headless PDFs

A feature request we get fairly frequently is the ability to convert an HTML document to a PDF. Maybe it’s a report of some sort or a group of charts but the goal is the same – faithfully replicate a HTML document as a PDF. If you try Google, you’ll get a bunch of options from the open source wkhtmltopdf to the commercial (and pricey) Prince PDF. We’ve tried those two as well as a couple of others and never been thrilled with the results. Simple documents with limited CSS styles work fine but as the documents get more complicated the solutions fail, often miserably. One conversion method that has consistently generated accurate results has been using Chrome’s “Print to PDF” functionality. One of the reasons for this is that Chrome uses its rendering engine, Blink, to create the PDF files.

So then the question is how can we run Chrome in a way to facilitate programmatically creating PDFs? Enter, Electron. Electron is a framework for building cross platform GUI applications and it provides this by basically being a programmable minimal Chrome browser running nodejs. With Electron, you’ll have access to Chrome’s rendering engine as well as the ability to use nodejs packages. Since Electron can leverage nodejs modules, we’ll use Gearman to facilitate communicating between our Electron app and clients that need HTML converted to PDFs.

The code as well as a PHP example are below:

As you can see it’s pretty straightforward. And you can start the Electron app by running “./node_modules/electron/dist/electron .” after running “npm install”.

One caveat is you’ll still need a X windows display available for Electron to connect to and use. Luckily, you can use Xvfb, which is a virtual framebuffer, on a server since you obviously wont have a physical display. If you’re on Ubuntu you can run the following to grab all dependencies and setup the display:

sudo apt-get install chromium-browser libgconf-2-4 xvfb
Xvfb :19 -screen 0 1024x768x16 &
export DISPLAY=:19

After that, you can launch your Electron app normally and it’ll use a virtual display.

Anyway, as always let me know if you have any questions or feedback!