Tips for setting up a TypeScript nodejs project

Note: This post originally appeared at Codeburst

At Setfive Consulting we’ve become big fans of using TypeScript on the frontend and have recently begun adopting it for backend nodejs projects as well. We’ve picked up a couple of tips while setting up these projects that we’re excited to share here!

Directory structure

For most nodejs projects any directory layout will work and what you pick will be a matter of personal preference. TypeScript is similar but in order to get the TypeScript compiler to generate JavaScript code into a “dist/” you’ll need to write your code inside a separate directory like “src/” within your project. So you’ll want a layout like the following:
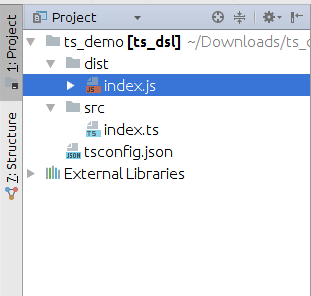
And the compiler will produce JavaScript code in “dist/” from your TypeScript sources in “src/”.

Setup tsconfig.json

As you can see above you’ll want a tsconfig.json file to configure the behavior of the TypeScript compiler. tsconfig.json is a special JSON configuration file that automatically sets various flags for you when you run “tsc” with it present. You can see an exhaustive list of the available options at here. We’ve been using the following as a solid starting point:

From a build perspective this will configure a couple of things for you:

  • sourceMaps are enabled so you’ll be able to use node’s DevTools integration to view TypeScript sources alongside your JavaScript
  • The compiler will output into a “dist/” folder
  • And it’ll compile all of your source files under the “src/” directory

ts-node and nodemon

One of the stumbling blocks to using TypeScript with nodejs is the required compilation step. At face value, it seems like the required workflow would be to edit a TypeScript file, run the compiler, and then run the generated JavaScript on node. Thankfully, ts-node and nodemon make that a reality you wont have to suffer.

ts-node is basically a wrapper around your nodejs installation that will allow you to run TypeScript files directly, without invoking the compiler. Their Readme highlights how it works:

TypeScript Node works by registering the TypeScript compiler for the .ts, .tsx and – when allowJs is enabled – .js extensions. When node.js has a file extension registered (the require.extensions object), it will use the extension internally with module resolution. By default, when an extension is unknown to node.js, it will fallback to handling the file as .js (JavaScript).

So with ts-node you’ll be able to run something like “ts-node src/index.ts” to run your code.

nodemon is the second piece of the puzzle. It’s a node utility that will monitor your source files for changes and automatically restart a node process for your. Perfect for building express or any server apps! We’ve been using the following nodemon.json config file:

And then you’ll be able to just invoke “nodemon” from the root of your project.

Remember “@types/” packages

Since you’re writing nodejs code chances are you’re going to want to leverage JavaScript libraries. TypeScript can interoperate with JavaScript but in order for the compiler to compile without errors you’ll need to provide “.d.ts” typings for the libraries you’re using. For example, trying to compile the following:

import * as _ from "lodash";
console.log(_.range(0, 10).join(","));

Will result in a TypeScript error:

src/index.ts(1,20): error TS7016: Could not find a declaration file for module ‘lodash’. ‘/home/ashish/Downloads/node_modules/lodash/lodash.js’ implicitly has an ‘any’ type.
Try `npm install @types/lodash` if it exists or add a new declaration (.d.ts) file containing `declare module ‘lodash’;`

Even though the output JavaScript file was successfully generated.

The “.d.ts” files are type definitions for a JavaScript library describing the types used, function signatures, and any other type information the compiler might need.

Several popular JavaScript libraries, like moment, have begun shipping the typings files within their main project but many others, like lodash, haven’t. In order to get libraries that don’t have the “.d.ts” files within their main project to work you’ll have to install their respective “@types/” packages. The “@types/” namespace is maintained by DefinitelyTyped but the definitions themselves have been written by contributors. Installing “@types/” packages is easy:

npm install — save @types/lodash

And now the compiler will run without any errors.

Off to the races!

At this point you should have a solid foundation for a TypeScript powered nodejs project. You’ll be able to take advantage of TypeScript’s powerful type system, nodejs’ enormous library ecosystem, and enjoy a easy to use “save and reload” workflow. And as always, I’d love any feedback or other tips!

Thinking about adopting TypeScript at your organization? We’d love to chat.

Electron: Beating anti-scraping software with Electron

I was recently out with a friend of mine who mentioned that he was having a tough time scraping some data off a website. After a few drinks we arrived at a barter, if I could scrape the data he’d buy me some single malt scotch which seemed like a great deal for me. I assumed I’d make a couple of HTTP requests, parse some HTML, grab the data and dump it into a CSV. In the worst case I imagined having to write some custom code to login to a web app and maybe sticky some cookies. And then I got started.

As it turned out this site was running one of the most sophisticated anti-scraping/anti-robot packages I’ve ever encountered. In a regular browser session everything looked normal but after a half dozen or so programmatic HTTP requests I started running into their anti-robot software. After poking around a bit it, the blocks they were deploying were a mix of:

  • Whitelisted User Agents – Following a few requests from PHP cURL the site started blocking requests from my IP that didn’t include a “regular” user agent.
  • Requiring cookies and Javascript – I thought this was actually really clever. After a couple of requests the site started quietly loading an intermediate page that required your browser to run Javascript to set a cookie and then complete a POST request to a URL that included a nonce in order to view a page. To a regular user, this was fairly transparent since it happened so quickly but it obviously trips up a client HTTP client.
  • Soft IP rate limits – After a couple of dozen requests from my IP I started receiving “Solve this captcha” pages in order to view the target content.

Taken all together, it’s a pretty sophisticated setup for what’s effectively a niche social networking site. With the “requires Javascript” requirement I decided to explore using Electron for this project. And turns out, it’s a perfect fit. For a quick primer, Electron is an open source project from GitHub that enables developers to build cross platform desktop applications by merging nodejs and Chrome. Developers end up writing Javascript that can leverage the nodejs ecosystem while also using Chrome’s browser internals to render windows and widgets. Electron helps in this use case because it provides a full Chrome browser that’s scriptable and has access to node’s system level modules. For completeness, you could implement all of this in a Chrome extension but in my experience extensions have more complicated non-privileged to privileged communication and lack access to node so you can’t just fire off a “fs.writeFileSync” to persist your results.

With a full browser environment, we now need to tackle the IP restrictions that cause captchas to appear. At face value, like most people, I assumed solving captchas with OCR magic would be easier than getting new IPs after a couple of requests but it turns out that’s not true. There weren’t any usable “captcha solvers” on npm so I decided to pursue the IP angle. The idea would be to grab a new IP address after a few requests to avoid having to solve a captcha which would require human intervention. Following some research, I found out that it’s possible to use Tor as a SOCKS proxy from a third party application. So concretely, we can launch a Tor circuit and then push our Electron HTTP requests through Tor to get a different IP address that your normal Internet connection.

Ok, enough talk, show me some code!

I setup a test “target page” at http://code.setfive.com/scraper_demo/ which randomly shows “content you want” and a “please solve this captcha”. The github repository at https://github.com/adatta02/electron-scraper-skeleton has all the goodies, a runnable Electron application. The money file is injected.js which looks like:

To run that locally, you’ll need to do the usual “npm install” and then also run a Tor instance if you want to get a new IP address on every request. The way it’s implemented, it’ll detect the “content you want” and also alert you when there’s a captcha by playing a “ding!” sound. To launch, first start Tor and let it connect. Then you should be able to run:

Once it loads, you’ll see the test page in what looks like a Chrome window with a devtools instance. As it refreshes, you’ll notice that the IP address is displays for you keeps updating. One “gotcha” is that by default Tor will only get a new IP address each time it opens a conduit, so you’ll notice that I run “killall” after each request which closes the Tor conduit and forces it to reopen.

And that’s about it. Using Tor with the skeleton you should be able to build a scraper that presents a new IP frequently, scrapes data, and conveniently notifies you if human input is required.

As always questions and comments are welcomed!

NodeJS: Running code in parallel with child_process

One of the nice things about nodejs is that since the majority of its libraries are asynchronous it boasts strong support for concurrently performing IO heavy workloads. Even though node is single threaded the event loop is able to concurrently progress separate operations because of the asynchronous style of its libraries. A canonical example would something like fetching 10 web pages and extracting all the links from the fetched HTML. This fits into node’s computational model nicely since the most time consuming part of an HTTP request is waiting around for the network during which node can use the CPU for something else. For the sake of discussion, let’s consider this sample implementation:

Request debugging is enabled so you’ll see that node starts fetching all the URLs at the same time and then the various events fire at different times for each URL:

So we’ve demonstrated that node will concurrently “do” several things at the same time but what happens if computationally intensive code is tying up the event loop? As a concrete example, imagine doing something like compressing the results of the HTTP request. For our purposes we’ll just throw in a while(1) so it’s easier to see what’s going on:

If you run the script you’ll notice it takes much longer to finish since we’ve now introduced a while() loop that causes each URL to take at least 5 seconds to be processed:

And now back to the original problem, how can we fetch the URLs in parallel so that our script completes in around 5 seconds? It turns out it’s possible to do this with node with the child_process module. Child_process basically lets you fire up a second nodejs instance and use IPC to pass messages between the parent and it’s child. We’ll need to move a couple of things around to get this to work and the implementation ends up looking like:

What’s happening now is that we’re launching a child process for each URL we want to process, passing a message with the target URL, and then passing the links back to the parent. And then running along with a timer results in:

It isn’t exactly 5 seconds since there’s a non-trivial amount of time required to start each of the child processes but it’s around what you’d expect. So there you have it, we’ve successfully demonstrated how you can achieve parallelism with nodejs.

Javascript: Using PhantomJS-node with Deferreds

Earlier this week, a buddy of mine reached out asking for a good solution to programmatically taking screenshots of a few thousand URLs. For whatever reason, this question seems to come up ever so often so I pointed him towards PhantomJS and figured he’d be on his way. Wrong. Not one to pass up free beer and the opportunity to learn something I agreed to write up the script to generate screenshots from a list of URLs.

Looking at PhantomJS, it seems relatively straightforward but it’s clear you’d really need something “else” to orchestrate this entire process. After some poking around, NodeJS, everyone’s favorite hipster runtime, seemed to be the obvious choice. There’s a handful of node modules that basically “bridge” node with phantom and allow a node script to asynchronously manipulate a PhantomJS instance. Based solely on the funny description I decided to run with phantomjs-node and was off to the races.

Getting everything setup was straightforward enough but then as I started looking at the phantomjs-node examples I started realizing this was a one way trip to callback soup. I’ve been doing some PhoneGap work recently and using jQuery’s Deferreds has significantly help keep the project from becoming a mess of callbacks. On the NodeJS side, it looks like there’s two functionally equivalent implementations but I decided to run with Q since the “wrapper” function names are shorter.

The Code

Anyway, the main problem we’re trying to address is that with multiple nested callbacks code becomes particularly difficult to follow. It’s hard to read, hard to trace control flow, and obviously hard to debug. Take for example, the phantomjs-node example:

It’s already THREE callbacks deep and all it’s done is initialize PhantomJS and load a page. Imagine layering on a few more asynchronous operations, doing all of this in a loop, and then some post-processing. Enter Deferreds. How To Node has an eloquent explanation of what deferreds are and how Node impliments them but in a nutshell they’re useful for making asynchronous code easier to follow.

The main issue I ran into using Q was that “Q.ninvoke” and “Q.npost” wrapper functions kept causing exceptions while using them with phantomjs-node. What I ended up doing instead was creating my own Deferreds in separate functions and then resolving them inside a normal callback.

My PhantomJS-node code ended up looking like:

It’s without a doubt easier to follow and would also make it much easier to do more complicated PhantomJS related tasks.

So how did screenshotting a few thousand domains go? Well there’s a story about that as well…