TypeScript decorators & Angular2 Dependency Injection

Note: This post originally appeared on Codeburst.io

One of the biggest differences between Angular 1.5+ and 2 is the latter’s approach to dependency injection. Back on Angular 1.5 there were a couple of ways to configure dependency injection but they relied on naming things consistently. If you needed the “$http” service you had to specify that by specifying a configuration explicitly mentioning “$http”. And unfortunately, it was also possible to do this with implicit annotations which would cause minification to break your code.

Angular2 with TypeScript dramatically improves on this by introducing a type based DI system where you just correctly specify the type of an injectable you want and Angular will handle the rest. But since TypeScript compiles to JavaScript and in doing so wipes any type information how can this DI system work? It’s not magic so lets take a look!

TypeScript Decorators

The first piece of the puzzle is the @Injectable TypeScript decorator which marks a class as available for DI. TypeScript decorators are a language feature which enables developers to use annotations to modify the behavior of classes, methods, and properties at run time. Within Angular, the @Injectable annotation is “class annotation” which Angular uses to register information about the target class with the framework. The relevant framework code is in the packages/core/src/di namespace with the most interesting files being:

Reading through the code is a bit challenging but the overall idea is that the framework keeps track of classes that have been annotated with @Injectable and then has a “get” method to correctly construct instances of those classes. OK but what about that type information?

reflect-metadata

The second piece of the DI puzzle is the reflect-metadata package and TypeScript’s “emitDecoratorMetadata” option. When used together they will cause the TypeScript compiler to output metadata for classes that have been annotated with a class decorator. And most importantly this metadata is accessible at runtime by userland JavaScript.

Concretely, the Angular DI system uses this metadata to introspect the arguments that the constructor a class marked @Injectable requires. And then naturally using that information the DI framework can automatically construct a class on demand for you.

An example DI system

Finally what we’ve all been waiting for, some sample code! In order to compile, you’ll need to enable the experimentalDecorators and emitDecoratorMetadata compiler flags, install the reflect-metadata package, and also use a recent version of TypeScript.

If you compile and run it you should get the following output:

Car { ex: [ Engine { maker: ‘Tesla’, displacement: 500 } ] }

So as expected we retrieved a Car without manually constructing an Engine and the Engine constructor was correctly invoked since the class properties were set.

Couple of things of note:

  • I created the “Newable” type alias to represent a constructor
  • The Inject decorator calls the Injector class in order to create some encapsulation
  • On line 10, the Reflect.getOwnMetadata(“design:paramtypes”, originalConstructor); call retrieves constructor information for the class that the decorator has been applied to.
  • Line 18 uses bind() to modify the class constructor to use the Injector to retrieve instances of the required classes

And that’s about it. After creating this example it’s clear that TypeScript’s decorators and the reflect-metadata are both powerful tools and I’m excited to explore what else they could enable.

Interested in adopting Angular or TypeScript at your organization? We’d love to chat.

Tips for setting up a TypeScript nodejs project

Note: This post originally appeared at Codeburst

At Setfive Consulting we’ve become big fans of using TypeScript on the frontend and have recently begun adopting it for backend nodejs projects as well. We’ve picked up a couple of tips while setting up these projects that we’re excited to share here!

Directory structure

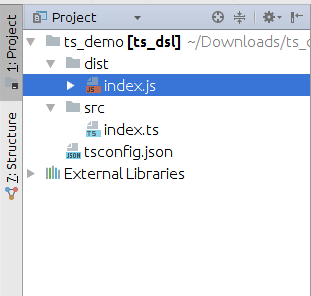
For most nodejs projects any directory layout will work and what you pick will be a matter of personal preference. TypeScript is similar but in order to get the TypeScript compiler to generate JavaScript code into a “dist/” you’ll need to write your code inside a separate directory like “src/” within your project. So you’ll want a layout like the following:

And the compiler will produce JavaScript code in “dist/” from your TypeScript sources in “src/”.

Setup tsconfig.json

As you can see above you’ll want a tsconfig.json file to configure the behavior of the TypeScript compiler. tsconfig.json is a special JSON configuration file that automatically sets various flags for you when you run “tsc” with it present. You can see an exhaustive list of the available options at here. We’ve been using the following as a solid starting point:

From a build perspective this will configure a couple of things for you:

  • sourceMaps are enabled so you’ll be able to use node’s DevTools integration to view TypeScript sources alongside your JavaScript
  • The compiler will output into a “dist/” folder
  • And it’ll compile all of your source files under the “src/” directory

ts-node and nodemon

One of the stumbling blocks to using TypeScript with nodejs is the required compilation step. At face value, it seems like the required workflow would be to edit a TypeScript file, run the compiler, and then run the generated JavaScript on node. Thankfully, ts-node and nodemon make that a reality you wont have to suffer.

ts-node is basically a wrapper around your nodejs installation that will allow you to run TypeScript files directly, without invoking the compiler. Their Readme highlights how it works:

TypeScript Node works by registering the TypeScript compiler for the .ts, .tsx and – when allowJs is enabled – .js extensions. When node.js has a file extension registered (the require.extensions object), it will use the extension internally with module resolution. By default, when an extension is unknown to node.js, it will fallback to handling the file as .js (JavaScript).

So with ts-node you’ll be able to run something like “ts-node src/index.ts” to run your code.

nodemon is the second piece of the puzzle. It’s a node utility that will monitor your source files for changes and automatically restart a node process for your. Perfect for building express or any server apps! We’ve been using the following nodemon.json config file:

And then you’ll be able to just invoke “nodemon” from the root of your project.

Remember “@types/” packages

Since you’re writing nodejs code chances are you’re going to want to leverage JavaScript libraries. TypeScript can interoperate with JavaScript but in order for the compiler to compile without errors you’ll need to provide “.d.ts” typings for the libraries you’re using. For example, trying to compile the following:

import * as _ from "lodash";
console.log(_.range(0, 10).join(","));

Will result in a TypeScript error:

src/index.ts(1,20): error TS7016: Could not find a declaration file for module ‘lodash’. ‘/home/ashish/Downloads/node_modules/lodash/lodash.js’ implicitly has an ‘any’ type.
Try `npm install @types/lodash` if it exists or add a new declaration (.d.ts) file containing `declare module ‘lodash’;`

Even though the output JavaScript file was successfully generated.

The “.d.ts” files are type definitions for a JavaScript library describing the types used, function signatures, and any other type information the compiler might need.

Several popular JavaScript libraries, like moment, have begun shipping the typings files within their main project but many others, like lodash, haven’t. In order to get libraries that don’t have the “.d.ts” files within their main project to work you’ll have to install their respective “@types/” packages. The “@types/” namespace is maintained by DefinitelyTyped but the definitions themselves have been written by contributors. Installing “@types/” packages is easy:

npm install — save @types/lodash

And now the compiler will run without any errors.

Off to the races!

At this point you should have a solid foundation for a TypeScript powered nodejs project. You’ll be able to take advantage of TypeScript’s powerful type system, nodejs’ enormous library ecosystem, and enjoy a easy to use “save and reload” workflow. And as always, I’d love any feedback or other tips!

Thinking about adopting TypeScript at your organization? We’d love to chat.

3 awesome features of the TypeScript type system

(Note: This originally appeared on Codeburst)

As of 2017 TypeScript has emerged as one of the most popular languages which can be “compiled down” to JavaScript for both browser and nodejs development. Compared to alternatives like Facebook’s Flow or CoffeeScript one of TypeScript’s most unique features is its expressive type system. Although TypeScript’s type system is technically dynamic, if you fully embrace it you’ll be able to leverage several features of the TypeScript compiler.

So what are a couple of these features? We’ll be looking at code from Setfive’s CloudWatch Autowatch an AWS cloud monitoring tool written in TypeScript. Since TypeScript is evolving so quickly it’s worth noting that these examples were run on version 2.4.2. Anyway, enough talk lets code!

Non-nullable types

If you have any experience with Java you’ve probably encountered the dreaded NullPointerException when you tried to deference a variable holding a “null” value. It’s certainly a pain and has been derided as a “billion dollar mistake” by its creator. To tackle NullPointerException bugs TypeScript 2.0 introduced the concept of non-nullable types. It’s “opt-in” via the “strictNullChecks” compiler flag which you can set your tsconfig.json

Consider this simple sample:

By default, the TypeScript compiler will compile that code since “null” is assignable to string[] but you’ll get an error about half the time you run it. Now, if we set “strictNullChecks: true” and run the compiler we’ll get an error:

partyguests.ts(5,9): error TS2322: Type ‘null’ is not assignable to type ‘string[]’.

Since the compiler can infer that at least one code path in the function produces a null which is now incompatible with an array. An example of this in the Autowatch code are the checks to ensure that PutMetricAlarmInput instances aren’t created with null dimensions. At line 462 for example.

Exhaustive type matching

Most programming languages with a Hindley–Milner type system have some functionality to perform a “pattern match” over a type. In practice, that allows a developer to make decisions about what to do with a set of objects based on the concrete type vs. their abstract signatures. For example, in Scala:

At face value it appears as if you can replicate this ES2015 JavaScript with something like:

That misses an important piece from the Scala example, the compiler guarantees an exhaustive match. If you added a new subclass of “Notification” like BulkSMS the Scala compiler would error because showNotification is missing that case. The JavaScript example wouldn’t be able to provide this and you’d end up getting a runtime error.

However, with TypeScript’s “never” type it’s possible to have the compiler guarantee an exhaustive match for us. We could do something like the following:

The important part is the call to “assertNever” which the compiler will error on if it detects is a reachable code path. We can confirm this if we add “BulkMessage” to the “MyNotification” type but not the if:

If you run the TypeScript compiler against that you’ll get an error highlighting that your if isn’t exhaustive since it’s hitting the “never”:

match2.ts(19,24): error TS2345: Argument of type ‘BulkMessage’ is not assignable to parameter of type ‘never’.

It’s certainly not as elegant as the Scala example but it does the job. You can see a real example in Autowatch starting at line 168 where we used it to guarantee exhaustive matching on the available AWS services.

Read-only class properties

Marking a class property “readonly” signals to the compiler that code shouldn’t be able to modify the value after initialization. Although “readonly” may sound similar to marking a property as “private” it actually enhances the type system in important ways. First, “readonly” properties make it possible to more faithfully represent immutable data. For example, a HTTP Request has a “url” which will never change after the request has started. And by marking properties as “readonly” as opposed to private you’re still able to return literal objects with matching properties.

Let’s look at an example:

If you run that through the TypeScript compiler you’ll get an error advising that the property is readonly:

readonly.ts(6,5): error TS2540: Cannot assign to ‘url’ because it is a constant or a read-only property.

Now, if you try and mark the url property as private and create a literal HttpRequest you’ll notice you’ll get an error:

But if you switch it back to “readonly” it’ll work as expected.

You can see real world usage of this in Autowatch, where we marked properties in our Config class as readonly since they should never change once the object has been constructed.

That’s a wrap

Well that’s three pretty cool features of the TypeScript type system that should help you be more productive and write better code. If you found these interesting, there’s several other interesting type related features that landed in 2.3+ versions of TypeScript that are worth checking out.

Amazon Athena and Amazon Redshift – Overview and Comparison

(Note: This is a guest post from our friends at Panoply)

Cloud-based data services are all the rage these days for many good reasons, and AWS (Amazon Web Services) is the current king of cloud-based data service providers, as this analysis carried out by StackOverflow indicates.

Two popular AWS cloud computing services for data analytics and BI are Amazon Redshift and Amazon Athena, both of which are useful for delivering actionable insights that drive better decision making from your data. However, with a dizzying amount of information available on both services, it’s a challenge to recognize what to look out for when choosing a cloud-based data service to meet your needs.

In this post, you’ll get a broad overview of cloud-based data warehousing, and you’ll come to understand the main differences between Amazon Redshift and Amazon Athena (also see this post by Panoply on the subject).

When you’re finished reading, you’ll know which service you should choose between Athena and Redshift. The comparison can also teach you what to look for in more general terms when considering any cloud-based data solution currently available.

A Data Warehouse in the Cloud

Traditional on-premise data warehouses are used for analyzing an organization’s historical data in one unified repository, pulling data from many different source systems, such as operational databases. Physical data warehouses are complex and expensive to build and maintain, though.

Cloud-based data warehouse services offer a much cheaper and easier way to use a data warehouse without needing any physical resources on site. Cloud-based providers host the necessary physical resources “in the cloud” while you simply pay for using the service.

Some examples of data warehouses in the cloud are:

  • Amazon Redshift—in Redshift, you provision resources and manage those resources similar to how you would in a traditional data warehouse, without the need to host physical computing resources on-site—AWS hosts them in the cloud instead as “clusters”. You simply connect your operational data sources to the cloud and move the data into Redshift for use with analytics and BI tools. Redshift uses a customized version of PostgreSQL.
  • Amazon Athena—Athena provides an interactive query service that makes it possible to directly analyze data stored in Amazon S3, which is the cloud storage service provided by AWS. You query data in Athena with standard ANSI SQL. In contrast to Redshift, Athena takes a serverless approach to data warehousing because you don’t need to provision resources or manage the infrastructure.
  • Google BigQuery—BigQuery is a serverless cloud-based data analytics platform that enables querying of very large read-only datasets, and it works in conjunction with Google Storage.
  • Azure SQL Data Warehouse—this Microsoft offering is a scalable and fully managed cloud-based data warehouse service.

You could write a book comparing all four of these services, so we’re going to hone in on both Amazon Redshift and Amazon Athena below.

Amazon Athena vs. Amazon Redshift – Feature Comparison

  • Initialization Time: Amazon Athena is the clear winner here because you can immediately begin querying data stored on Amazon S3. Redshift, on the other hand, requires you to prepare a cluster of computing resources and load data into the tables you create.
  • User-defined Functions: Amazon Redshift supports user-defined functions (UDFs), which are procedures that accept parameters, perform an action, and return the result of that action as a value. Amazon Athena has no support for UDFs.
  • Data Types: Amazon Athena supports more complex data types, such as arrays, maps, and structs, while Redshift has no support for such complex data types.
  • Performance: For basic table scans and small aggregations, Amazon Athena outperforms Redshift. However, for complex joins and larger aggregations, Redshift is a better option.
  • Cost: Athena’s cost is based on the amount of data scanned in each query, which means it’s important to compress and partition data. Since Amazon Athena queries data on S3, the total cost of S3 data storage combined with Athena query costs gives the full price. Redshift’s cost depends on the type of cloud instances used to build your cluster, and whether you want to pay as you use (on demand) or commit to a certain term of usage (reserved instances).


Athena’s cost is $5 per terabyte of data scanned, while Redshift’s hourly costs range from $0.250 to $4.800 per hour for a DC instance, and $0.850 to $6.800 per hour for a DS instance.

AWS Redshift Spectrum, Athena, S3

Redshift Spectrum is a powerful feature that enables data querying in Redshift directly from S3. With Spectrum you can create a read-only external table, with its data located in a specified S3 path, and immediately begin querying that data without inserting it into Redshift. You can also join the external tables with tables that already reside on Redshift.

Querying data in S3: sounds familiar, right? That’s because Amazon Athena performs a similar function—it’s an S3 querying service. It’s important to note, however, that Spectrum is not an integration between Redshift and Athena—Redshift queries the relevant data on its own from S3 without the help of Athena.

If you are already an Amazon Redshift user, it makes sense to opt for Spectrum over Athena because of the convenience. However, if you aren’t currently using Redshift, it’s best to choose Athena over Spectrum because your investment in computing resources might go underutilized in Redshift. For your current analytics needs, Athena is likely to do the job—you can always invest in a Redshift+Spectrum combination later on when it’s needed to handle lots of data.

Athena vs. Redshift – Which Should You Choose?

There is no widespread consensus on whether Amazon Athena is better than Redshift or vice versa—both services suit different uses.

  • Amazon Athena is much quicker and easier to set up than Redshift, and this querying service outperforms Redshift on all basic table scans and small aggregations. The accessibility of Athena makes it better suited to running quick ad hoc queries.
  • For complex joins, larger aggregations, and very large datasets, Redshift is better due to its computational capacity and highly scalable infrastructure.
  • The conclusion, therefore, is that Redshift is likely the cloud-based data warehouse platform of choice if you have lots of data and many complex queries to run. Amazon Athena is the recommended cloud-based service for analyzing your data in all other cases, and it’s suitable for small- to medium-sized organizations.

Closing Thoughts

Cloud-based data warehouses are quickly replacing traditional on-premise data warehouses because of their convenience, lower cost, and scalability.

Amazon Athena and Amazon Redshift take differing approaches to cloud-based data analytics services—Redshift requires resource provisioning and infrastructural management while Athena abstracts operational management away from users and allows direct querying of data stored on Amazon S3.

Amazon Spectrum provides separation of storage and compute in Redshift by allowing you to directly query data in S3, similar to Athena. Spectrum is useful if you already use Redshift, but you shouldn’t base your decision on Athena versus Redshift on the Spectrum feature.

The relevant comparison between Amazon Athena and Redshift relates to how they perform, what they cost, which tools they support, their usability, their accessibility, supported data types, and user-defined functions. You should base your end decision between Redshift and Athena on these factors, prioritizing the most important aspects of each service for your particular business. Maybe you prefer Athena’s effortless accessibility? Or maybe you’d rather the control and scalability you get in Redshift?

When weighing up any potential cloud-based data warehouse, always consider the above factors, instead of just choosing the most affordable solution.

MySQL: Composite indexes in 5 minutes

Despite how important they are, MySQL indexes are a bit of a dark art. Sure everyone knows indexes are important but details on how they’re implemented and when they’ll be used are hard to come by. Beyond regular indexes, MySQL’s composite indexes are especially opaque in regards to how and when they’ll be used. As the name suggests composite indexes are an index constructed across two columns versus a regular index on a single column. So when might a composite index come in handy? Let’s take a look!

We’ll look at a table “client_order” that captures some fictional orders from our fictional clients:

And we’ll fill it up with 5 million fictional orders with dates spanning the last 10 years. You can grab the data from https://setfive-misc.s3.amazonaws.com/client_order.sql.gz if you want to follow along locally.

To get started, let’s figure out the total amount spent for a couple of clients:
https://gist.github.com/adatta02/f675b2c7b0659ab960d791b44ee02861

~1.5 seconds to calculate the sums and according to the EXPLAIN MySQL had to use a temporary table and a filesort. Will an index help here? Lets add one and find out.

~0.2 seconds and looking at the EXPLAIN we’ve cut down the number of rows MySQL has to look at to 424, much better. OK great, but now what if we’re only interested in looking at data from Christmas Eve in 2016?

(Note: Details on why we’re querying with full timestamps below)

As you can see, MySQL is still using the client_id index but we’re left still scanning 281,308 rows even though only 335 are actually relevant to us. So how do we fix this? Enter, the composite index! Let’s add one on (client_id, created_at) and see if it helps our query:

It helps but we’re clearly still looking a lot more rows than we need. So what gives? It turns out the order of the composite index is actually critically important since that dictates how MySQL assembles the b-tree for the index. Let’s flip the order of our index and try again:


And there you go! MySQL only has to look at 1360 rows as expected.

So what’s up with having to query with the full timestamps vs. just using DATE(created_at)? It turns out MySQL can’t use datetime indexes when you apply functions to the column you’re querying on. And beyond that, even certain ranges cause MySQL to not select indexes that would work fine:

Which then leads to the unintuitive conclusion that if you actually needed to implement any sort of aggregation by day you’d be better off adding a “date” column calculated from the “created_at” and indexing on that:

Anyway, as always comments and feedback welcome!